Attributes of a Tessellation
Of all the regular polygons, there are only three that will tessellate completely on their own. Those three are triangles, squares and hexagons. But what exactly is it abou these three that make them so special? Let's take a look:

and here are some others:
 The difference is in the measures of their interior angles. As you can see, squares meet at each vertex with 90+90+90+90=360 Triangles meet with 60+60+60+60+60+60=360. Hexagons meet with 120+120+120=360. Because of this, whenever their angles meet, there is no overlap and no holes in the picture. But as we try to apply that to other shapes, it leaves us with problems, just as you can see in the picture above. Below is a table for other regular polygons.
| Regular Shape | Interior Angle Measure | 360/Interior Angle | Tessellates? |
| Regular Pentagon | 108 | 360/108=3.333 | No |
| Regular Heptagon | 128.57 | 360/128.57=2.800 | No |
| Regular Octagon | 135 | 360/135=2.667 | No |
| Regular Nonagon | 140 | 360/140=2.571 | No |
| Regular Decagon | 144 | 360/144=2.5 | No |
 As you can see, these regular polygons do not divide 360 by a whole number, so they will always need to overlap or leave holes at certain vertices. However, you can substitute in other polygons to go in those holes.
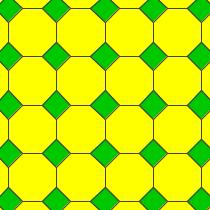
If we look at one of the points where the vertices are, we will see in this picture we will have two angles at 135 from the octagons, and 90 from the square. 90+135+135=360, which gives us what we need to be able to tessellate our objects. So now that we know a little more about our angles in regular tessellations, what about those shapes that are not regular? and what about the sides to the shapes? How are those related to each other? Use the following applet to create your own conjectures.
Choose one point and move it, observing the changes in the tessellation. What does it change? Why?
Do all of the points do similar things?
What happens when you create a self-intersecting polygon? Does it still tessellate? What happens to it?
Can you manipulate the shape into something more familiar/recognizable?
Write down a few conjectures for creating tessellations based on your observations.
Back to Top
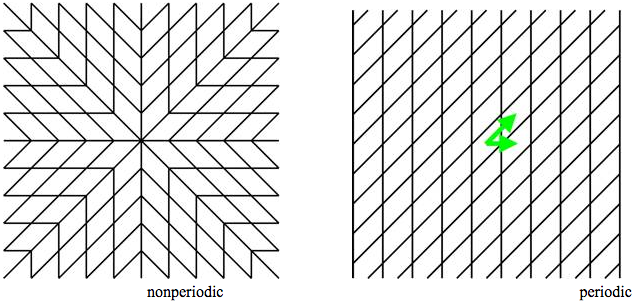
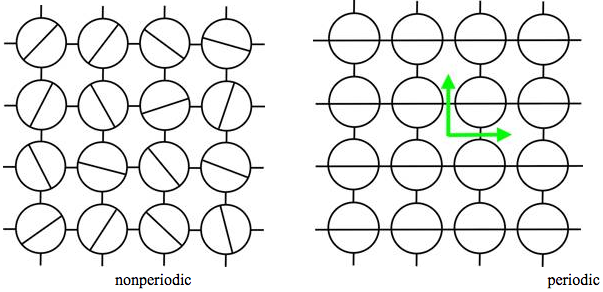
Believe it or not, there are a few different types of Tessellations out there, and can be classified into two different categories: Periodic and Non-periodic.
Periodic:
In periodic tiling, the pattern repeats itself at regular intervals and uses a translation to be able to tile the rest of the tessellation. These tilings are the most common type of tessellation, the most famous being by Escher himself. Examples of this include regular tilings, which are tilings that only include regular polygons, as well as many of M.C. Escher, such as his lizard painting as well as his duck and fish. Periodic tilings are designed in such a way as to be able to translate a certain image a fixed distance in a given direction and the tiling would repeat itself.
Non-periodic:
In a non-periodic tiling, tiles are set up in such a way that they cannot be made using a translation. In a non-periodic tiling, the same prototiles(the set of tiles used for a tessellation) can be used as in a periodic tessellation, but they are placed in a manner that is non-periodic.
 There are, however, sets of prototiles that force a non-periodic tessellation. These are classified as aperiodic. In 1964, the long-held belief that there were no such aperiodic tiles was shattered, a man named Robert Berger found a set of prototiles from which he demonstrated aperiocity. In this demonstration, he had to use a set of 20,426 tiles! This set was subsequently reduced down to 104, and then a little while later it was reduced to only four by another man named Hans Lauchli. Finally, in 1971 Raphael Robinson simplified the set down to six.
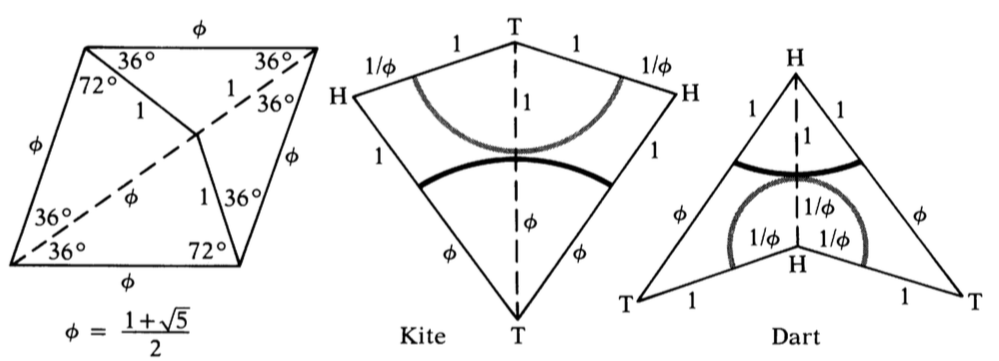
 In 1974, a man named Robert Penrose came into the picture and fundamentally changed the conversation about tilings forever. This set of prototiles needs only two shapes. While the pairs of shapes of penrose tiles vary, the most interesting is a set named Kites and darts. They are derived from a rhombus with angles of 72 and 108 degrees. When dividing this rhombus up, there is another famous number that crops up in the kite and dart assembly, and that is the Golden ratio. Divide the long diagonal into one plus the square root of five divided by 2, and then join those points to the obtuse angles and you have yourself a pair of penrose tiles. There are rules to putting together the kite and dart, because a rhombus tiles periodically. To enforce this rule, two arcs of different colors can be drawn on each tile, and each edge must join arcs of the same color.
The connections between the golden ratio and these Penrose tilings do not stop there. The number of pieces needed also points toward the fascinating number. You might think that you would need more of the smaller darts, but in all reality, you need 1.618...as many kites as darts. As you can see by the picture, its construction is riddles with phi, the representation for the golden ratio, so it seems fitting that the area also pays homage to the famous ratio.
The other significent set of penrose tiles are a set of two rhombuses. All edges are the same length, with one set of angles being 36, 144, and the other being 72,108. Although there are many sets of pentrose tiles, any theorem relating to the kites and darts can be translated into a theorem about the Rhombuses or any other pair of Pentrose tiles and vice versa. In fact, we can see the close relationship that the Rhombuses and the Kite and Dart sets have to one another in this pentagram.
This Pentagram is special, because each line segment is the golden ratio to the next smaller one, and this pentagram can be continued forever in both directions. Within this diagram, we can find the kite and dart. We can also find the pair of Rhombuses. Thus we can see that all sets of discovered prototiles that force aperiocity are related to the Golden Ratio.
Robert Ammann has also worked with aperiodic tilings, and has recently found a set of two pentagons and a hexagon that force non-periocity with no markings at all.
Back to Top
In this applet, you can begin to see some of the relationships between the set of Rhombuses and the kite and dart tiles. In this Activity, click on a shape in the upper left hand corner to begin your tessellation at, as well as select 1L to begin. As you move up in levels, notice what the relationship is between the two sets of tiles. Is there a pattern that you can see for where the tiles are being placed?
Take notice of the shape that is being formed as it moves up to level 5. Is there a certain shape that it holds to even when the tiles change, or does the new set of tiles completely change it?
How is the shape growing?
When you switch from one level to another, can you still find a hint of the other in the picture?
After you have finished, study this picture and reread the section beginning with "In 1974, a man named.." until the end. Write down any observations and new things that you learned dafter having engaged in this activity.
Back to Top